spring boot集成mybatis |
您所在的位置:网站首页 › updatebyid 返回0 › spring boot集成mybatis |
spring boot集成mybatis
|
大家好,我是小哈。 本小节中,我们将学习如何通过 Mybatis Plus 修改数据库表中的数据。 表结构在前面小节中,我们已经定义好了一个用于测试的用户表, 执行脚本如下: DROP TABLE IF EXISTS user; CREATE TABLE `user` ( `id` bigint(20) UNSIGNED NOT NULL AUTO_INCREMENT COMMENT '主键ID', `name` varchar(30) NOT NULL DEFAULT '' COMMENT '姓名', `age` int(11) NULL DEFAULT NULL COMMENT '年龄', `gender` tinyint(2) NOT NULL DEFAULT 0 COMMENT '性别,0:女 1:男', PRIMARY KEY (`id`) ) COMMENT = '用户表'; 定义实体类定义一个名为 User 实体类: @TableName("user") public class User { /** * 主键 ID, @TableId 注解定义字段为表的主键,type 表示主键类型,IdType.AUTO 表示随着数据库 ID 自增 */ @TableId(type = IdType.AUTO) private Long id; /** * 姓名 */ private String name; /** * 年龄 */ private Integer age; /** * 性别 */ private Integer gender; }不明白 Mybatis Plus 注解的小伙伴,可参考前面小节 , 有详细解释。 开始修改数据Mybatis Plus 对 Mapper 层和 Service 层都将常见的增删改查操作封装好了,只需简单的继承,即可轻松搞定对数据的增删改查,本文重点讲解修改数据部分。 Mapper 层定义一个 UserMapper , 让其继承 BaseMapper : public interface UserMapper extends BaseMapper { }然后,注入 Mapper : @Autowired private UserMapper userMapper;BaseMapper 提供的修改方法以 update 开头,方法如下: 解释一下每个方法的作用: # 根据主键 ID 来更新 int updateById(T entity); # entity 用于设置更新的数据,wrapper 用于组装更新条件 int update(T entity, Wrapper updateWrapper); 示例代码根据主键 ID 来更新: User user = new User(); user.setId(1L); user.setName("修改后的犬小哈"); user.setGender(0); // 实际执行的 SQL : UPDATE user SET name='修改后的犬小哈', gender=0 WHERE id=1 int count = userMapper.updateById(user); System.out.println("受影响的行数:" + count);entity 用于设置更新的数据,wrapper 用于组装更新条件: User user = new User(); user.setName("修改后的犬小哈2"); user.setGender(0); // 组装更新条件,更新 age = 20 的数据 UpdateWrapper updateWrapper = new UpdateWrapper(); updateWrapper.eq("age", 20); // 实际执行的 SQL : UPDATE user SET name='修改后的犬小哈2', gender=0 WHERE (age = 20) int count = userMapper.update(user, updateWrapper); System.out.println("受影响的行数:" + count); Service 层Mybatis Plus 同样也封装了通用的 Service 层 CRUD 操作,并且提供了更丰富的方法。接下来,我们上手看 Service 层的代码结构,如下图:
先定义 UserService 接口 ,让其继承自 IService: public interface UserService extends IService { }再定义实现类 UserServiceImpl,让其继承自 ServiceImpl, 同时实现 UserService 接口,这样就可以让 UserService 拥有了基础通用的 CRUD 功能,当然,实际开发中,业务会更加复杂,就需要向 IService 接口自定义方法并实现: @Service public class UserServiceImpl extends ServiceImpl implements UserService { }注入 UserService : @Autowired private UserService userService;Service 层封装的更新方法均以 update 开头,方法如下: 这里把常用的一些删除方法摘出来: // 根据 ID 来更新,entity 用于设置 ID 以及其他更新条件 boolean updateById(T entity); // wrapper 用于设置更新数据以及条件 boolean update(Wrapper updateWrapper); // entity 用于设置更新的数据,wrapper 用于组装更新条件 boolean update(T entity, Wrapper updateWrapper); // 批量更新 boolean updateBatchById(Collection entityList); // 批量更新,可手动设置批量提交阀值 boolean updateBatchById(Collection entityList, int batchSize); // 保存或者更新 boolean saveOrUpdate(T entity); 示例代码Service 层和上面 Mapper 的使用方法差不多,这里演示一下 boolean update(Wrapper updateWrapper) 使用示例: UpdateWrapper updateWrapper = new UpdateWrapper(); // set name = '更新后的犬小哈' updateWrapper.set("name", "更新后的犬小哈"); // where id = 1 AND age = 30 updateWrapper.eq("id", 1L).eq("age", 30); // 实际执行 SQL : UPDATE user SET name='更新后的犬小哈' WHERE (id = 1 AND age = 30) boolean isSuccess = userService.update(updateWrapper); System.out.println("更新是否成功:" + isSuccess);TIP : saveOrUpdate(T entity) 在前面《新增数据》 小节已有详细说明,可翻阅前面章节。 |

 定义 Service 层
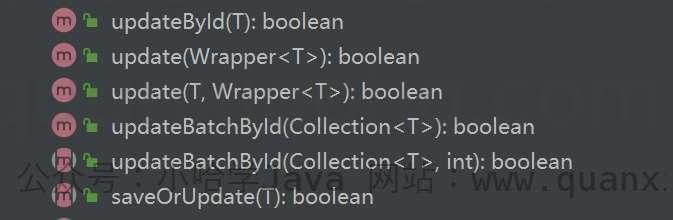
【本文地址】
今日新闻 |
推荐新闻 |